Relationship Template Editor
Video – How To Create A Relationship Template
The NodeEra Relationship Template Editor provides the mechanism for defining Neo4j Relationships. The Relationship Template defines the combination of Node Templates, Properties, and Constraints that define a certain “type” of Relationship.
Relationship Templates have a number of uses within NodeEra:
- Provide an understanding of the business data definitions in your graph model
- Create diagrams that illustrate the design of your graph
- Add additional description metadata
- Allow smart data editing of relationships based on the relationship template
- Automatically generate Cypher queries based on the relationship template
How To Access The Relationship Template Editor
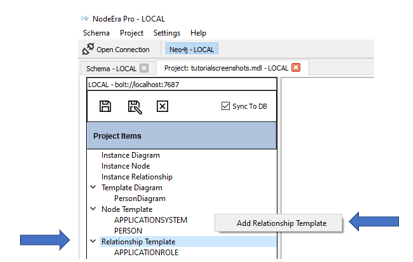
Figure 1: Create a new relationship template
In the Project Items tree view you can add a new Relationship Template by right clicking on the Relationship Template heading.

Figure 2: Right Click On Relationship Templates in the project view
For existing relationship templates:
Double click on the name and the relationship editor will open.
right click on the name and you will get the pop-up menu shown above.
- Properties… – this will display the relationship template editor.
- Rename… – this will display the rename object dialog.
- Delete… – this will display the delete object dialog.
- Where Used… – this will display the where used dialog.
- Generate Cypher Match – This will generate a cypher match statement based on the relationship template and display it in the Schema Cypher editor where you can run the query
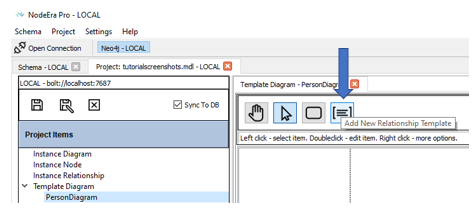
Figure 3: Add New Relationship Template On The Template Diagram.
With a Template Diagram open, you can click on the Add New Relationship Template button. This will open the relationship template editor and place the new relationship template on the diagram. See the Template Diagram Tutorial for more help on creating template diagrams.
How To Define a Relationship Template
The relationship template editor has several tabs that allow you to define your relationship template. The tabs are:
Definition – define the relationship type, from/to node templates, cardinality and properties
Constraint – define any property exists constraints for the relationship
Description – provide additional text metadata
Formats – define display formats used on diagrams
Data – query, add new, delete, or edit relationships in the database
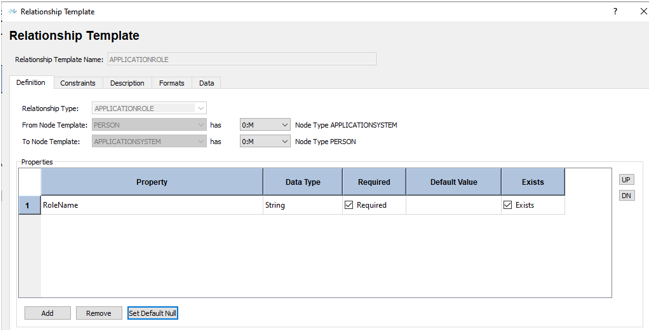
Figure 4: Definition tab
The definition tab defines the relationship and its properties.
The fields on the dialog are defined as follows:
Relationship Template Name: This is the name of the relationship template in NodeEra.
Relationship Type: This is the relationship type that is used to create relationships in Neo4j. You can select from existing relationship types from the project or enter a new one.
From Node Template: This is the node template that describes the type of node that can be used as the “from” node in this relationship.
To Node Template: This is the node template that describes the type of node that can be used as the “to” node in this relationship.
Has: Next to the “From node template” and “To node template” is a dropdown that allows you to set the cardinality for each side of the relationship. This is for documentation purposes but has no effect on Neo4j queries. The default is zero or more.
Properties Grid: The properties grid allows you to define properties for the relationship. The grid has the following buttons that control actions in the grid:
Add: This button will add a new row to the grid. Once the row is added you can edit the columns in the row (see section below).
Remove: This will remove the selected property from the grid. This does not remove properties from relationships in the databases.
Set Default Null: If you have provided a default value for a property in the grid and then change your mind, you cannot simply clear the default value column. That will be seen as a default value of “empty string”. You need to select the property in question and click the “Set Default Null” button to remove the default value.
Up: This moves the selected property up one row in the grid.
Down: This moves the selected property down one row in the grid.
Columns in the Property Grid
After you add a row to the property grid you enter each column in the grid itself. The columns are described below.
Property: This is the property name used in Cypher queries. You can select from existing property names or enter a new property name.
Data Type: If you have entered a property name that isn’t defined in the project you can specify the data type by selecting one from the list. If you property is already defined in the project, the system will select the correct one for you. You can’t change the datatype here, you must edit the property itself from the project tree view.
Required: This checkbox allows you to define the property as being required without creating an exists constraint. NodeEra will respect this when using the Data tab to add/update/delete relationship data.
Default Value: This allows you to define a default value which NodeEra will use when using the Data tab to add/update/delete relationship data.
Exists: This checkbox indicates if this property has an “exists” constraint defined on it. See the “Constraints” tab for how to create the constraint. The checkbox is read only.
How To Define A Neo4j Constraint
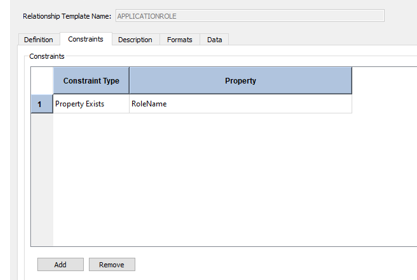
Figure 5: Constraint tab
The constraint grid provides the ability to define constraints on relationships. Once you have defined constraints in your project model, you can generate Cypher create statements using the Project – Forward Engineer menu option.
The grid has the following buttons that control actions in the grid:
Add: This will add a new row to the constraints grid.
Remove: This will remove the selected row from the constraints grid.
Columns in the Constraint Grid
After you add a row to the constraint grid you enter each column in the grid itself. The columns are described below.
Constraint Type: There is only one constraint type for relationship properties – “Property Exists”.
Property: The dropdown will show you all the properties defined for this relationship template. Select one to define the constraint.
How To Describe The Relationship Template
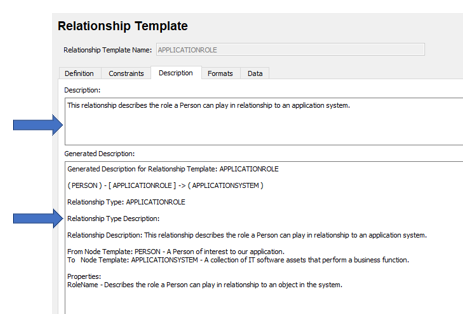
Figure 6: Description Tab
This tab provides descriptive metadata for the relationship template. You can enter a description at the top of the form. The “Generated Description” section of the form shows all the descriptive metadata from the node templates and properties that make up the relationship definition.
The descriptions will be used for the generated HTML pages. See Project – Generate HTML menu option.
How To Define Display Formats For Relationship Templates
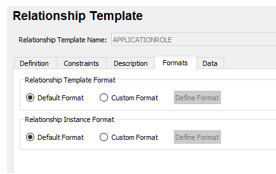
Figure 7: Relationship Template Formats
You can define various display characteristics that control how templates/instances are displayed on diagrams. See the Display Format Tutorial for more details.
Relationship Template Format – this section controls how relationship templates will be displayed on a template diagram.
- Click the “Custom Format” radio button and then the “Define Format” button to create a custom display format.
- Click the “Default Format” radio button to use the display format defined in Project Settings.
Relationship Instance Format – this section controls how instance relationships that are based on this relationship template will be displayed on an instance diagram.
- Click the “Custom Format” radio button and then the “Define Format” button to create a custom display format.
- Click the “Default Format” radio button to use the display format defined in Project Settings.
How To Add, Modify, and Delete Relationships Based On The Relationship Template
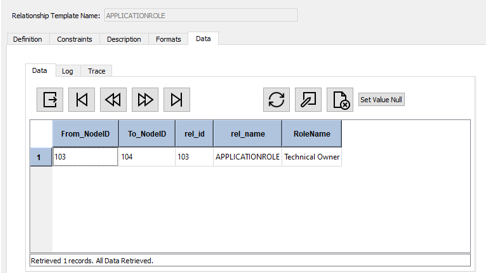
Figure 8: Data Editor
The Data tab provides a data entry facility based on the relationship template. You can add/edit/delete relationships in the Neo4j database that match the template definition. When you click on the Data tab, NodeEra will automatically generate a Cypher query and retrieve all matching relationships and display them in the grid.
Columns in the Relationship Editor Grid
The first four columns in the grid are the same for every relationship template and cannot be changed.
From_NeoID: This is the Neo4j node id for the “from”node.
To_NeoID: This is the Neo4j node id for the “to”node.
Rel_id: This is the Neo4j relationship id for the relationship.
Rel_name: This is the Neo4j relationship type for the relationship.
Any properties defined for the relationship template will be shown after the four columns described above. These properties can be edited right in the grid.
Buttons on the Relationship Editor Grid
The standard navigation buttons are described in the Cypher Data Grid Tutorial. On the right hand side are three new buttons described below.
Add New: This button will bring up the add new relationship dialog described below.
Delete: This button will delete the relationship selected in the grid.
Set Value Null: This button will set the selected property value null in the database. Note that Neo4j does not support “null values” so what actually happens is the property is removed from the relationship in the database.
New Relationship Dialog
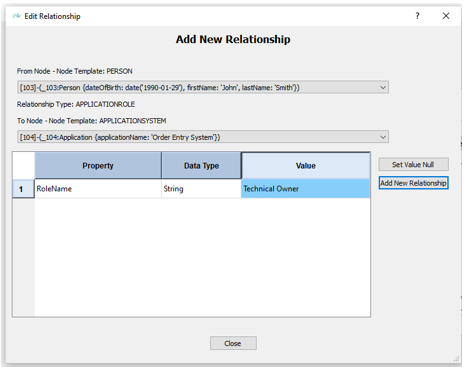
Figure 9: Add New Relationship
The Add New Relationship dialog provides a facility for adding relationships to the Neo4j database that are consistent with the relationship template.
At the top of the form you select the From Node and the To Node. The dropdowns will show you the nodes in the database that match the node templates defined for the relationship template.
The grid shows each property defined for the relationship template. You can enter a value for each property in the Value column. If you enter a value and then decide you would rather leave the property null use the “Set Value Null” button on the right.
When you have completed entering the data, press the “Add New Relationship” button. NodeEra will create a new relationship in the Neo4j database. Note that if you click the button again, NodeEra will create another relationship that will be exactly the same.