Goldmine Trains provides an excellent set of decals for the Gilpin ore car. This post will describe where to install these decals on the Gilpin ore car.
Historical View
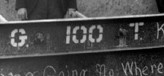
This is a close up of a historical photo showing where the numbers are located on the side of the ore car.
The Decal Set

The decals are your typical water-based slide off decals and the method used to install them is basically the same as all decals so I’m not going to repeat that here. They use white lettering on a clear background, so you don’t have to worry about matching your paint job to the background of the decal. The picture above shows the entire set which comes on one strip.
I actually created a font specifically for the unique stenciled block lettering seen in the historic photos. You can read more about how I did that here.
Decal Installation
The decals are supplied on one strip of paper and you have to cut out the “G”, the number, and the “T” separately to install them.

Here we see the decals installed on the side of the ore car. The letters were installed separately from the numbers. The ore car pictured above is an On30 kit produced by Goldmine trains.

Here we see the end view of the ore car. The car number only is installed on the right hand side. (apologies for the bad focus on this photo).
Finally
So that’s where to install the decals for the Gilpin ore car. I hope you found this useful. For more information on modeling this unique tramway or how to hike the remaining right-of-way please read my other posts.