NodeEra Schema Editor
The NodeEra Schema Editor allows you to create and drop Neo4j schema objects. This includes constraints, users, and roles. These items can be created individually with easy to use UI’s or you can generate Cypher create and/or drop statements to process in bulk.
This article describes how to create Neo4j schema objects by using a simple point and click user interface.
A screen shot of the NodeEra schema editor is shown below.
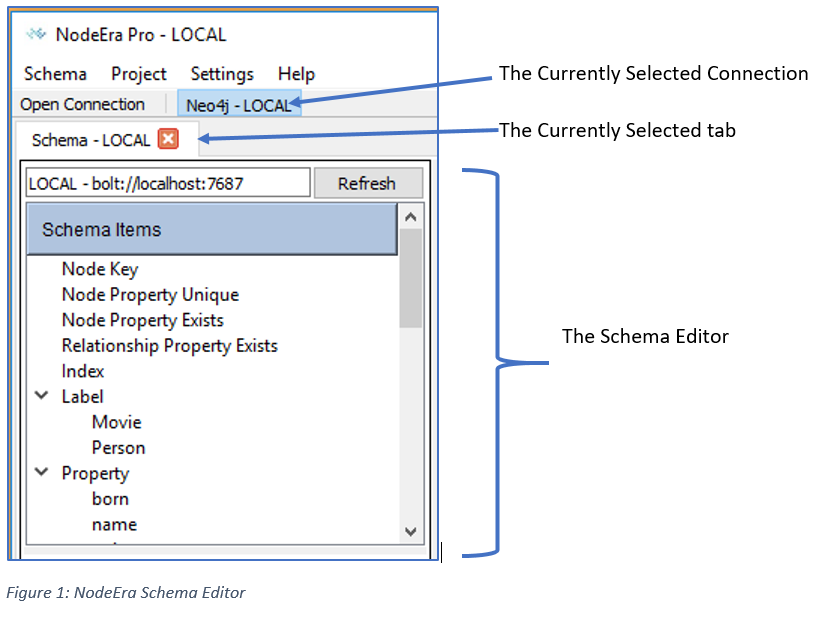
The screen shot above shows the schema editor connected to the tutorial Neo4j instance which has the Movie database loaded.
There will be one Schema tab for each connection you have open. The Schema tab shows you the connection name. Note that in this illustration there is only one connection open, and only one tab for that connection is open. You can have many connections open at the same time, and each connection can have it’s one schema tab and many project tabs open at the same time.
At the top of the schema editor you see the connection name and the URL of the connected Neo4j database.
The “Refresh” button will re-read all the schema objects from Neo4j and redisplay the tree view. NodeEra will in most cases automatically refresh the schema tree view when the underlying objects change.
Schema Main Menu Options
The NodeEra main menu has a Schema menu option that provides the following options.
- Open Connection…
- Displays the list of Neo4j connections you have defined and allows you to select one to open. Opening a connection will display the Schema Editor tab for that connection and also allow you to open Projects that will work with that open connection.
- Close Connection…
- This will close the currently selected open connection including all open projects and cypher files.
- Generate Schema…
- This will display a dialog box that allows you to generate schema object create and/or drop statements. The generated cypher statements will displayed in the cypher editor where you can run them or save them. Once they are saved, you can run them against a different Neo4j database.
See the Generate Schema Tutorial
- Reset User Password…
- This allows the user to login to the connected Neo4j instance as any user and reset their password.
See the Manage Neo4j Users Tutorial
- Neo4j Connection Manager…
- This will display the Neo4j Connection Manager dialog box. This allows you to define, edit, and test Neo4j connections. Each connection contains the information needed for NodeEra to connect to and run queries against Neo4j.
See the Manage Neo4j Connections Tutorial
Schema Editor Tree View Context Sensitive Menu Options
You can right click on any of the tree view headings to get a context sensitive menu.
For Constraints, Indexes, Users, and Roles you will get the following choices:
- New…
- This will display a dialog box that provides an easy way to create a new schema object.
- Generate Creates…
- This will display the Generate Schema dialog box with the schema object type already selected. You can generate Cypher create statements from this dialog and run them from the Cypher editor.
- Generate Drops…
- This will display the Generate Schema dialog box with the schema object type already selected. You can generate Cypher create statements from this dialog and run them from the Cypher editor.
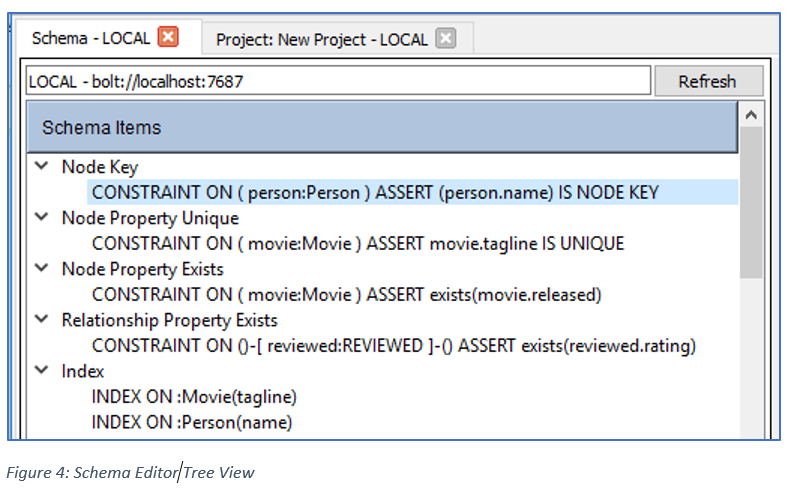
The tree view also displays all the existing schema objects under each of the headings. You can right click on any of the schema objects and get a context sensitive menu.
Note – not all object types have all of the context sensitive menu choices.
- Edit…
- This will display a dialog box allowing you to make changes to the schema object (only User and Role)
- Drop…
- This will display a dialog box that will drop the selected object if you so choose.
- Generate Match…
- This will generate a Cypher match statement based on the selected schema object and open a cypher editor window with the generated statement. You can run the query and review the results if you like. This is a great way to quickly explore the property graph data.
Tutorial: How To Create A Neo4j Node Key Constraint In NodeEra
This tutorial describes how to create a Node Key Constraint using NodeEra.
A Node Key constraint creates a “primary key” for a node. This allows rapid retrieval of specific nodes in the graph and enforces uniqueness of the Node Key.
A Node Key consists of exactly one Label and the combination of one or more property values.
An index will be automatically created that Neo4j will use to enforce the constraint. This index will appear in the schema editor tree view after the Node Key constraint is created.

To create a Node Key constraint, complete the following steps:
1. Select a Label from the drop-down list. The list will contain all existing Labels in the graph. Alternatively, you can type in any valid Label name and it will be created.
2. Select a Property from the drop-down list or enter a new Property name and click the “Add To List” button. This will add the property to the list below.
3. Repeat step 2 until all of the desired properties are in the list.
4. Use the “Move Up” or “Move Down” buttons to arrange the Properties in the correct order.
5. Use the “Remove From List” to remove any un-needed Properties from the list.
6. Click “OK” to create the Node Key Constraint.
7. Click “Cancel” to close the dialog box without taking any action.
The Node Key Constraint will now appear in the Schema Editor tree view.
In this example we created a Node Key constraint on the “Person” label and the “name” property.
Also, note that an Index was created automatically and is now visible under the “Index” parent heading in the tree view. Like constraints, indexes do not have names so NodeEra simply displays the description of the index used in the create statement.
Tutorial: How To Create A Neo4j Node Property Unique Constraint In NodeEra
This tutorial describes how to create a Node Property Unique Constraint using NodeEra.
The Node Property Unique constraint will cause Neo4j to insure that every time a property is given a value in a node with a given label, that property value will be unique across all instances of nodes that have that label.
This doesn’t imply that any node with the given label must contain the property. This is accomplished with the Node Property Exists constraint.
An index will be automatically created that Neo4j will use to enforce the constraint. This index will appear in the schema editor tree view after the Node Key constraint is created.

To create a Node Property Unique constraint complete the following steps:
1. Select a Label from the drop down list. The list will contain all existing Labels in the graph. Alternatively, you can type in any valid Label name and it will be created.
2. Select a Property from the drop down list or enter a new Property name.
3. Click “OK” to create the Node Property Unique Constraint.
4. Click “Cancel” to close the dialog box without taking any action.
The Node Property Unique constraint appears in the Schema Editor tree view (see below).

In this example, we created a Node Property Unique constraint on the label “Movie” and the property “tagline”. This implies that each “Movie” node that has a “tagline” property will have a unique value for “tagline” but this does not imply that each “Movie” Node must have a “tagline” property.
Tutorial: How To Create A Neo4j Node Property Exists Constraint In NodeEra
This tutorial describes how to create a Node Property Exists Constraint using NodeEra.
The Node Property Exists constraint will cause Neo4j to ensure that every time a Node with the given label is created or updated it will have a value for the given property.
No Index is created to enforce this constraint.
The constraint will not be created if any existing Relationship violates the constraint.
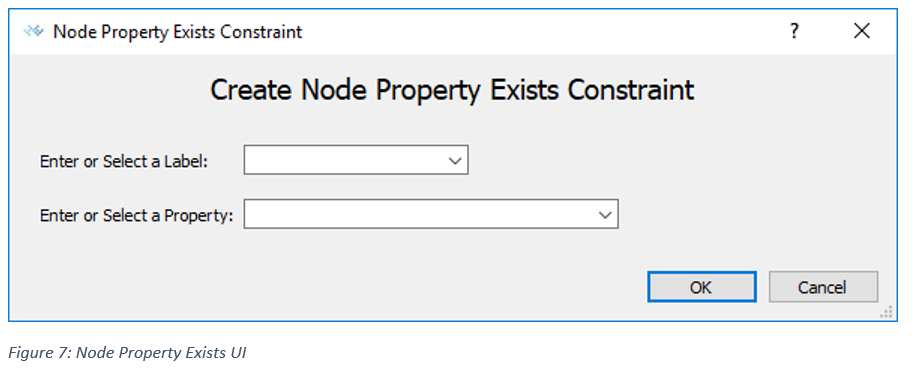
To create a Node Property Exists constraint complete the following steps:
1. Select a Label from the drop down list. The list will contain all existing Labels in the graph. Alternatively, you can type in any valid Label name and it will be created.
2. Select a Property from the drop down list or enter a new Property name.
3. Click “OK” to create the Node Property Exists Constraint.
4. Click “Cancel” to close the dialog box without taking any action.
The Node Property Exists constraint appears in the Schema Editor tree view (see below).

In this example, we created a Node Property Exists constraint on the “Movie” label and the “released” property.
Tutorial: How To Create A Neo4j Relationship Property Exists Constraint In NodeEra
This tutorial describes how to create a Relationship Property Exists Constraint using NodeEra.
The Relationship Property Exists constraint will cause Neo4j to ensure that every time a Relationship with the given type is created or updated it will have a value for the given property.
No Index is created to enforce this constraint.
The constraint will not be created if any existing Relationship violates the constraint.

To create a Relationship Property Exists constraint complete the following steps:
1. Select a Relationship type from the drop down list. The list will contain all existing Relationship types in the graph. Alternatively, you can type in any valid Relationship type and it will be created.
2. Select a Property from the drop down list or enter a new Property name.
3. Click “OK” to create the Relationship Property Exists Constraint.
4. Click “Cancel” to close the dialog box without taking any action.
The Relationship Property Exists constraint appears in the Schema Editor tree view (see below).

In this example we created a Relationship Property Exists constraint on the “REVIEWED” relationship type and the “rating” property.
Tutorial: How To Create A Neo4j Index In NodeEra
This tutorial describes how to create an Index using NodeEra.
An Index allows rapid retrieval of specific nodes in the graph and improves sorting speed in queries.
Indexes are non-unique, that is an index value may occur in more than one Node. The Node Key constraint should be used if you want to achieve uniqueness in the indexed Label and Properties.
An Index consists of exactly one Label and the combination of one or more property values.
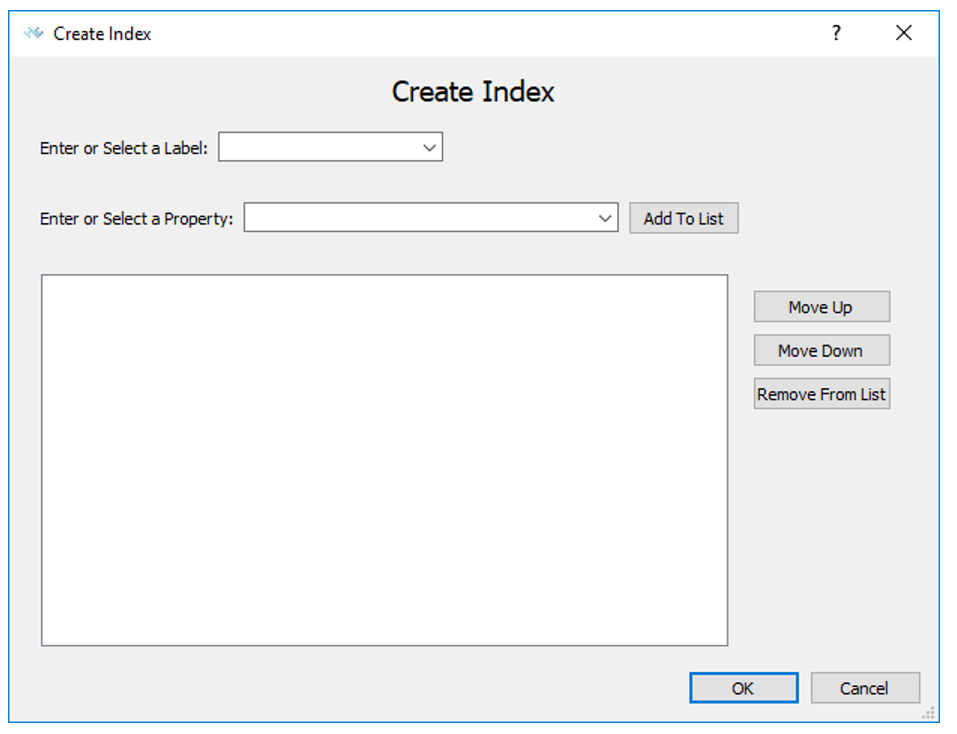
To create an Index complete the following steps:
1. Select a Label from the drop down list. The list will contain all existing Labels in the graph. Alternatively, you can type in any valid Label name and it will be created.
2. Select a Property from the drop down list or enter a new Property name and click the “Add To List” button. This will add the property to the list below.
3. Repeat step 2 until all of the desired properties are in the list.
4. Use the “Move Up” or “Move Down” buttons to arrange the Properties in the correct order.
5. Use the “Remove From List” to remove any un-needed Properties from the list.
6. Click “OK” to create the Index.
7. Click “Cancel” to close the dialog box without taking any action.
The newly created Index appears in the Schema Editor tree view (see below). In this example, we created an Index using the “Movie” label and the “Released” property.

The new Index appears under the parent heading “Index” in the tree view.
Constraints don’t have names in Neo4j so NodeEra simply shows you the description of the constraint used in the create statement.