This post will describe how to configure SSH and install Putty to connect from your laptop to a Raspberry Pi. SSH stands for Secure Shell and provides a simple means for one computer to login to another computer and run a “shell” (in Windows parlance a command line window). This post will show you how to use SSH on a Raspberry Pi.
Enable SSH On The Raspberry Pi
Click on the Application Menu (Raspberry icon), then Preferences, then Raspberry Pi Configuration. The dialog box shown below will appear.
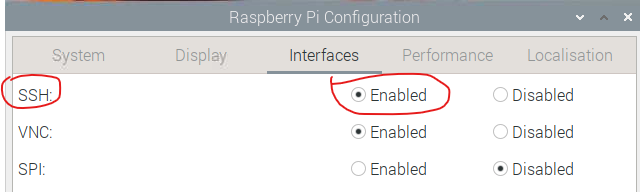
Click on the Interfaces tab and you will see a list of interfaces that can be enabled on the Raspberry Pi. For now, we are only concerned with SSH so click that one enabled as shown above.
This is how to enable SSH on the Raspberry Pi.
Install Putty On Windows
With SSH enabled you can now use an appropriate client program to “shell” into the Raspberry Pi using SSH. On Windows a popular program called Putty is what we will use.
Click here to find Windows Putty download.
Once you have downloaded Putty follow the standard procedure for installing Windows software.
Connect To Raspberry Pi Using Putty
Run the Putty program and you will see the main page for Putty as shown below.
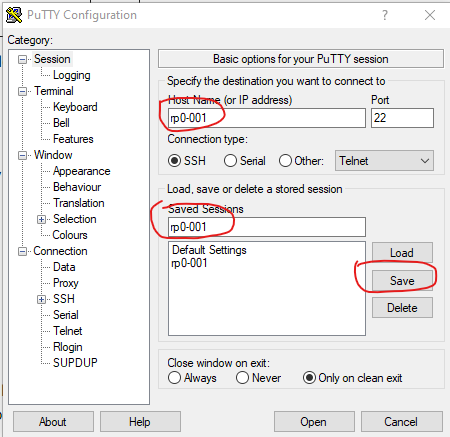
At the top of the screen enter a host name or the IP address of your Raspberry Pi.
Click Here to find out how to find the hostname or IP address of a Raspberry Pi
Leave the port set at the default value “22”. Also, leave the connection type set at the default “SSH”. If you want to save this connection configuration enter a name in the “Saved Sessions” text box and click the Save button. This will save the connection information so you can use it again. Now click the Open button at the bottom of the screen and a Putty terminal window will appear. It will ask you for a userid and password to login to the Raspberry Pi. Typically you would use the “Pi” user that is created when you initially installed the Raspberry Pi OS.
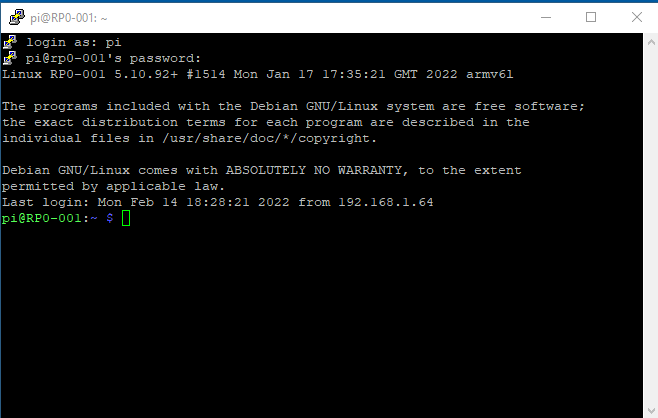
The screenshot above shows a Putty window after loggin in. You can see the command prompt has the userid@hostname of the Raspberry Pi. This terminal will allow you to enter any linux command just as if you had a terminal window open on the Raspberry Pi.
And Finally…
So that’s it. You’re ready to go “headless” with your Raspberry Pi (in other words you can disconnect the monitor/mouse/keyboard) and still login as a terminal user from your laptop/desktop.
See all the cool Raspberry Pi Posts here…
Please leave comments or questions below.