This post will explain how to use the Raspberry Pi Imager to install and configure an operating system (OS) for your Raspberry PI. Most of you will want to install the Raspberry Pi OS but there are other specialized linux variants you can also install using the Raspberry Pi Imager.
The Raspberry Pi Imager is the new version and replaces the previous imager known as NOOBS (New Out Of The Box Software). So if you are looking for how to install a Raspberry Pi OS using NOOBS I recommend switching to the newer Raspberry Pi Imager.
It’s possible you started your R-Pi adventure with a microSD card that has Raspberry Pi OS pre-installed so you’re wondering why do I want to do this myself. There are several reasons not the least of which is you’ve made such a mess out of your current OS configuration by manually modifying network configuration files that now you’re only hope is starting over with a fresh install. Not that this ever happened to me. Another reason to configure your own SD cards is that your R-Pi project is headless so you want to configure the SD card on another machine that has a monitor and keyboard.
What Do You Need
You will need the following:
- A Raspberry Pi that is in need of an SD card with a fresh OS installed
- A micro SD card
- A micro SD card slot in your laptop or some kind of adapter that allows you to connect a micro SD card into the normal sized SD card slot.
- The Raspberry Pi Imager installed on your laptop
Instructions
1 – How To Install The Raspberry Pi Imager
Go to the Raspberry Pi Imager webpage to download the installer for your particular machine (Windows, Mac etc.) Click on the following link:
Raspberry Pi OS – Raspberry Pi
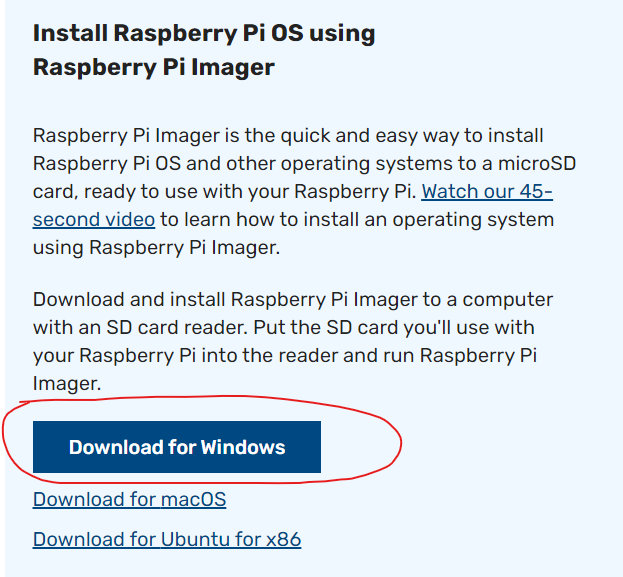
Click on the OS you are running on your laptop/desktop. In the screen shot above I clicked on the Download for Windows button and the installer exe was downloaded onto my machine. At this point follow the appropriate installation procedure for your client OS. In Windows you just run the downloaded exe file and then follow the installer instructions. That’s it – once you finished installing you can burn your first microSD card.
2 – Load A MicroSD Card Into Your Laptop
Take the microSD card and plug it into the microSD slot on your laptop. There’s a good chance you don’t have one but you probably have an SD card slot which means you will need an adapter like what is pictured below.
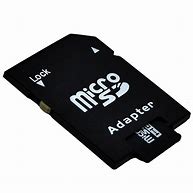
This is an example of an SD card adapter. It’s basically the same shape as a normal SD card and has a slot for the microSD card to slide into. Put your microSD card in the adapter and then put the adapter into your laptops SD card slot.
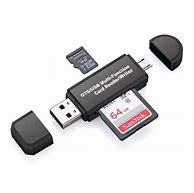
If you don’t have an SD card adapter in your machine you might need something like what is pictured above. This unit plugs into a USB port and sports slots for regular and micro SD cards.
3 – How To Use The Raspberry Pi Imager
Start the Imager program and you will see the home page as seen below.
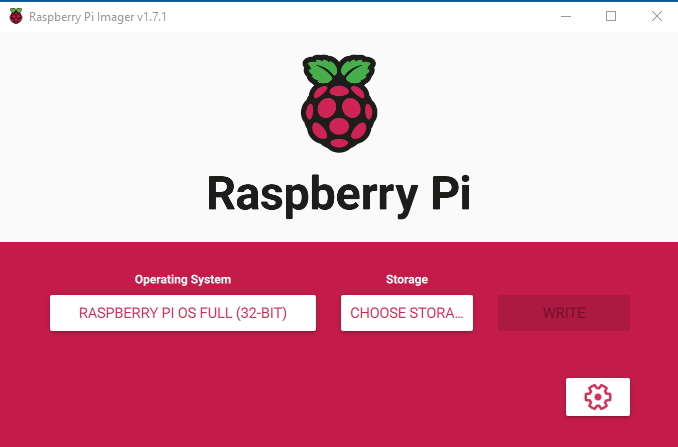
Click on the Operating System dropdown and select the OS you want to install on the microSD card. In the example above I selected the Raspberry Pi OS Full (32 bit).
Next Click on the Storage dropdown and select the microSD card you have inserted into your laptop.
At this point you are ready to write the OS image onto the selected microSD card. But wait, there’s more…
4 – How To Pre-configure The Raspberry Pi OS
Before clicking the “Write” button (see screen shot above) you should click the gear icon which will bring up the configuration dialog shown below.
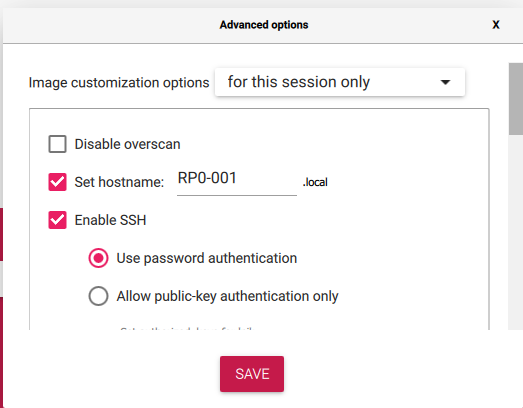
The very first question “Image customization options” gives you two choices:
- for this session only – the options you select will be applied during the current usage of Raspberry Pi Imager but will not be saved between sessions.
- to always use – the options you select will be saved and reloaded the next time you run Raspberry Pi Imager thus saving you the effort of re-entering them.
Disable Overscan – check this box if you want to disable overscan
Set Hostname: – check this box and provide a host name for the Raspberry Pi
Enable SSH – check this box to enable SSH. Check one of the authentication options (typically password).
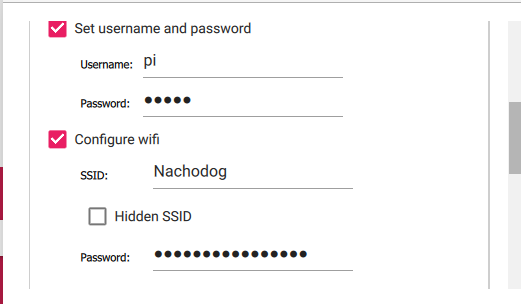
Set username and password – check this box to change the default username/password. Typically use pi as the username and provide a password of your own choosing.
Configure wifi: – check this box to setup the connection to your Wifi router. Enter the SSID (this is the name of your Wifi network) and the password. Also select a country from this list for Wifi country.
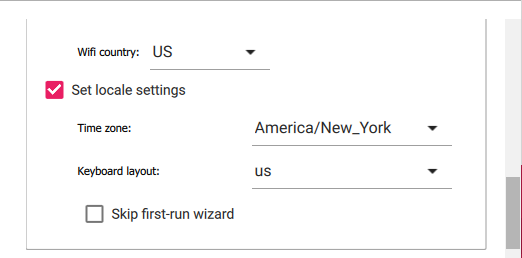
Set Locale settings – check this box to provide your timezone and keyboard layout.
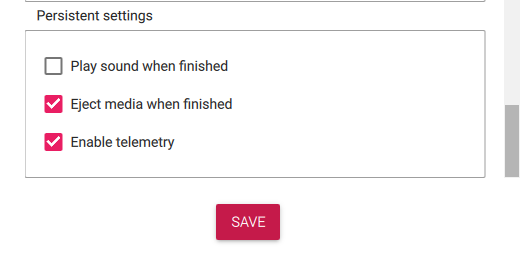
Persistent Settings – check the desired options.
5 – Write The OS Image To The MicroSD Card
When you’ve finished filling in the configurations press the “Save” button and you will return to the home page. At this point you are ready to build your Raspberry Pi OS image on to microSD card. Just click the “Write” button and the microSD card will be updated with the OS and options you selected.
Finally
And that is how you create a new Raspberry Pi OS image on a microSD card. All you need to do now is put that microSD card into your Raspberry Pi and boot it up!
See all the cool Raspberry Pi Posts here…
Please leave comments or questions below.