This post will look at the “Virtual Network Computing” capability supplied with the Raspberry Pi and how to VNC into a Raspberry Pi from another computer. Why would you want to use Virtual Network Computing (VNC)? VNC provides a client/server program that will allow you to connect to your Raspberry Pi from another computer (typically your laptop or desktop windows machine). Once you connect from your laptop, you will see the exact same Raspberry Pi OS graphical user interface you would see if you had a monitor connected directly to the Raspberry Pi. It is very typical to work on Raspberry Pi projects where the pi is “headless” – in other words, there is no monitor attached. That is why you need to know how to VNC into a Raspberry Pi.
RealVNC Virtual Network Computing Software
The good news is the fine people at RealVNC have provided a free version of the the RealVNC server and it’s already installed on your Raspberry Pi. All you have to do is enable the server to start running whenever the pi starts up. The great news is RealVNC also provides a free version of the client software for you to install on your laptop.
How To Configure Your Laptop To Connect To Your Raspberry Pi
The following steps will walk you through how to setup the VNC software on both the Raspberry Pi and your laptop.
1 – Enable VNC Server On Your Raspberry Pi
The VNC server is pre-installed on your Raspberry Pi OS (aka Raspian) system but you need to enable it first. Select the Application (Raspberry) menu option, then Preferences, then Raspberry Pi Configuration as shown below.

This will display the Configuration dialog box shown below. This dialog box allows you to enable/disable various system interfaces. For now just make sure the VNC option is “Enabled”. See the screenshot below.
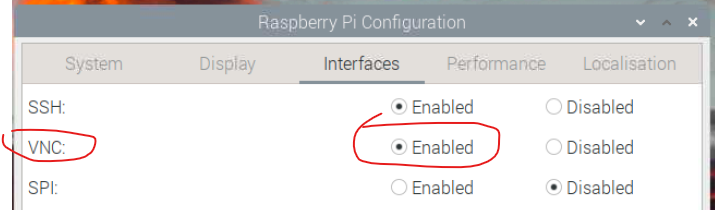
That’s it – that is how to enable VNC on your Raspberry Pi. Once enabled the VNC server will start automatically everytime the Raspberry Pi boots up.
2 – Install VNC Viewer On Your Laptop
Go to the Real VNC web page linked below…
Download VNC Viewer for Windows | VNC® Connect (realvnc.com)
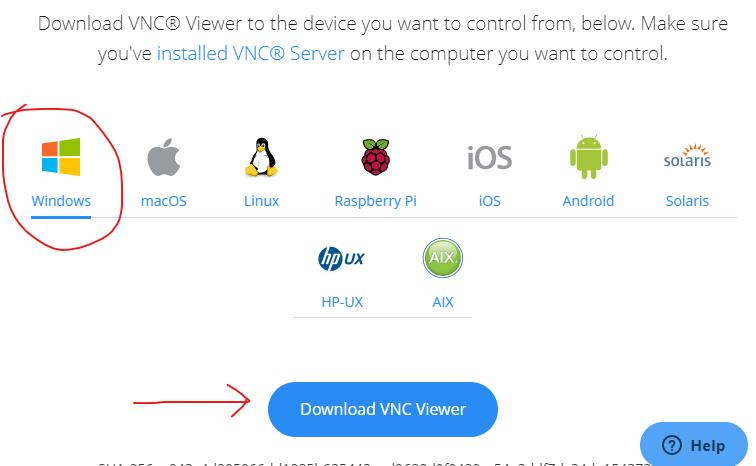
This web page will allow you to select your client computer type. In the screenshot I’ve selected Windows but you might have a Mac or a linux box. Click the “Download VNC Viewer” button to download the VNC Viewer installer. On Windows you will find an exe file in your downloads folder. Just run the exe and follow the installation instructions. The VNC Viewer program on your laptop/desktop will talk to the VNC Server program on the Raspberry Pi. Of course both the client computer and the Raspberry Pi have to be connected to your local network which is typically your Wifi network.
That’s how to install the VNC client software.
3 – Connect To The Raspberry Pi From Your Laptop
Once you’ve installed the viewer you need to configure a connection to the Raspberry Pi. Simply select the File / New Connection… menu option and you get the dialog box shown below.
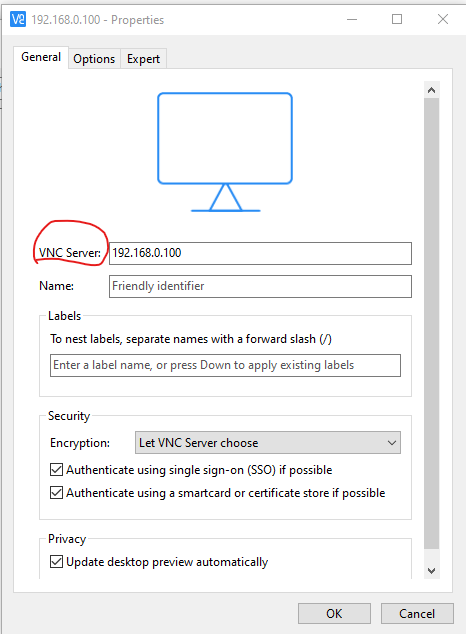
You have two choices for the “VNC Server” – enter the IP address of your Raspberry Pi or enter the host name. In the screenshot above I’ve entered the IP address.
Click Here to find out how to find the hostname or IP address of a Raspberry Pi
The “Name” field is optional and provides a user friendly name for your pi. Of course if you use the host name that’s probably pretty user friendly. All the other fields on this form you can leave with the default settings to get started. Click “OK” when you’re finished.
When the dialog closes the main screen will show all of the connections you’ve configured. See the screenshot below.
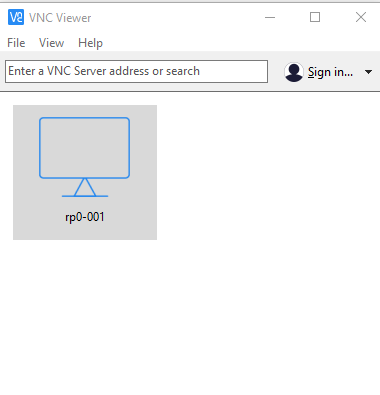
The screen shot above shows one connection configured for hostname rp0-001. You might eventually have many connections configured. Simply doubleclick on the connection icon and the VNC viewer will appear on your laptop/desktop displaying the Rasbperry Pi OS user interface! Now you can do anything on the Pi as if you were sitting in front of it. This is how to create a direct connection from your laptop to a Raspberry Pi.
How To Create A Remote Connection
It is important to note that we have created a “direct” connection between our laptop and the Raspberry Pi. By “direct” we mean the two devices are on the same local network – typically your home wifi network. But what if my laptop is traveling with me and I want to connect to the Raspberry Pi which is at home? To do that you need to create a remote or “cloud” connection. Fortunately, the RealVNC software provides a free solution for that as well. Click here for how to create a remote or “cloud” VNC connection.
Modify The Raspberry Pi Screen Resolution
Once you connect to the Raspberry Pi from your laptop you might not like how the screen appears. This might be caused due to the Raspberry Pi screen resolution not matching the monitor on your laptop/desktop. To fix this problem you can easily adjust the Raspberry Pi resolution.
Click on the Application menu (raspberry icon) / Preferences / Raspberry Pi Configuration
This will display the configuration dialog box shown below. Click on the “Display” tab.
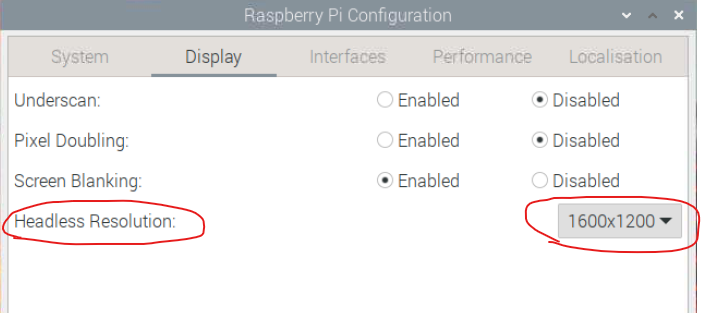
Set the “Headless Resolution” to the option that is closest to (but not greater than) your laptop/desktop monitor. You will have to re-boot the raspberry pi for this to take effect. Also note that if your raspberry pi is also connected to it’s own monitor this option will not make any difference as the VNC client will use the connected monitor’s resolution.
This is how to fix VNC monitor resolution issues.
And Finally…
So that’s it. You’re ready to go “headless” with your Raspberry Pi (in other words you can disconnect the monitor/mouse/keyboard) and still continue to operate it as if it were a desktop computer.
See all the cool Raspberry Pi Posts here…
Please leave comments or questions below.