This post will describe how to create a Python script to display a form in FreeCAD. First, we will look at how to set up FreeCAD for python scripting. Then we will look at a basic Python script that will display the “Macro Parameter” form as a dialog box, and then as a form in the FreeCAD task panel.
This is the third post in a three part series. Before you start this post you must have completed the steps in the first two posts listed below:
- How To Setup QtCreator To Use With FreeCAD
- How To Create A User Interface For Your FreeCAD Python Scripts
- How To Create A Python Script To Display A Custom Form In FreeCAD (this post)
If you aren’t familiar with Qt Designer and creating forms in Qt I recommend going through some tutorials on the subject.
How To Set Up FreeCAD for Python Scripting
This section describes how to set up FreeCAD for Python scripting.
Python Console
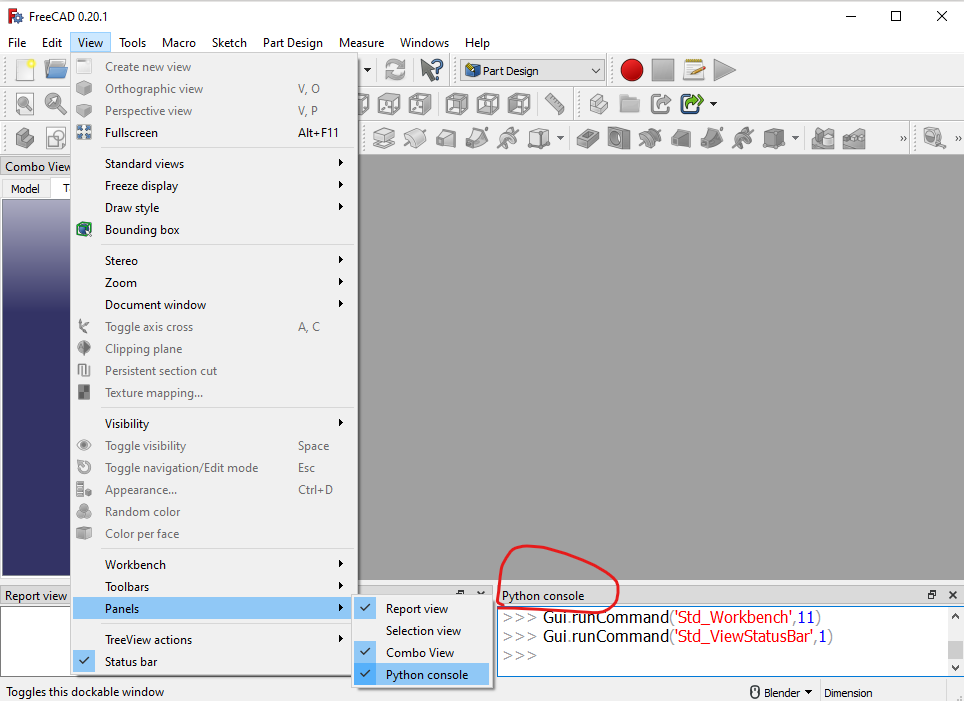
First we need to display the Python console. This is an interactive python console that lets you access all of FreeCAD’s python modules and run python commands interactively. Do the menu selection shown above – View / Panels / Python Console and you should see the python command line at the bottom of the screen. Try typing “Print(“Hello World”) into the command prompt and hit enter.
Where to place python scripts/modules
The next question is where do I put my python files so FreeCAD can see them? There are two places by default, one intended for module files and the other for macro’s or python scripts.
The interpreter will look in the “mod” folder for python module files. You should put your class files here, especially ones that will be imported into any main python scripts. In Windows the location of the “mod” folder is %APPDATA%\FreeCAD\Mod\, which is usually C:\Users\
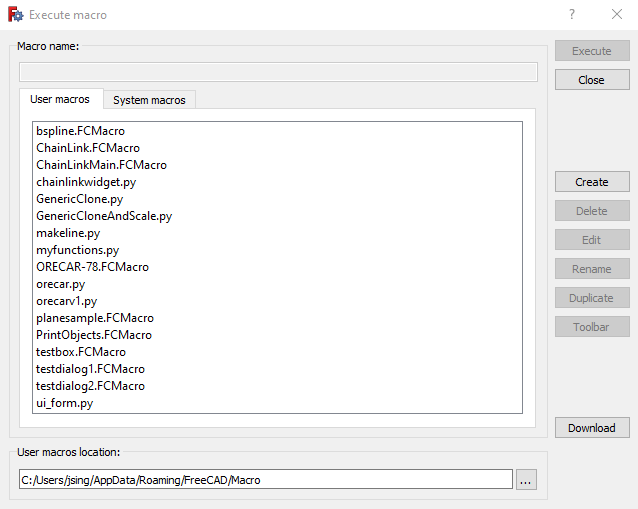
The screen shot above show the “Macros” dialog box. This can be accessed from the FreeCAD menu Macro / Macros… Note the “User macros location” at the bottom of the screen. This is where FreeCAD locates your python scripts which can be named either .py or .FCMacro.
How To Display A Modeless Dialog In FreeCAD
This section describes how to display our “Macro Parameter” form created in Qt Designer as a dialog box in FreeCAD.
from PySide import QtGui
w = FreeCADGui.PySideUic.loadUi(r"C:\Users\jsing\xxx\SAMPLEAPP\boxdialog.ui")
w.show()
Simply enter the lines of code shown above in the python console. Make sure you modify the file name in the second line to point to your .UI file. This will display a modeless dialog box. Unfortunately, our demo UI file doesn’t have any OK/Cancel buttons so no logic can be executed. We can solve this problem by displaying the dialog box in the task panel which is described next.
How To Display A Dialog Box In The FreeCAD Task Panel
This section describes how to display our “Macro Parameter” dialog box in the FreeCAD task panel. The full script is shown below.
import FreeCAD
import FreeCADGui
from PySide import QtGui

# CHANGE THE LINE BELOW
path_to_ui = r"C:\Users\jsing\xxx\SAMPLEAPP\boxdialog.ui"

class BoxTaskPanel:
	def __init__(self):
       # this will create a Qt widget from our ui file
		self.form = FreeCADGui.PySideUic.loadUi(path_to_ui)

	def accept(self):
		print("accept")
		print("Name: {}".format(self.form.txtName.text()))
		# put FreeCAD processing logic here
		pass
		# close the dialog
		FreeCADGui.Control.closeDialog()

	def reject(self):
		print("reject")
		FreeCADGui.Control.closeDialog()

print("start")
panel = BoxTaskPanel()
try:
	FreeCADGui.Control.showDialog(panel)
except Exception as e:
	print("error displaying dialog")
First we set a variable called path_to_ui to a string that contains the full path to the .ui file we created using Qt Designer.
Now we define a class called BoxTaskPanel. This task encapsulates the logic performed by the UI. The __init__ method creates a variable self.form that contains the code needed to display the UI. This is automatically generated by the FreeCAD supplied helper function called FreeCADGui.PySideUic.loadUi(). This does the same thing as running the Qt UIC utility which was described in the post on designing a form in Qt Designer.
Next we see the Accept and Reject methods. These will be called when you click on the OK or Cancel buttons respectively. The OK and Cancel buttons are provided by FreeCAD on the task panel so we didn’t have to put them on our form.
print("Name: {}".format(self.form.txtName.text()))Here you can see how we print out the contents of the text box which we named “txtName” when designing the UI. This shows how to access contents of the UI. The Accept method is where you would put any data editing and FreeCAD processing logic.
After the BoxTaskPanel class definition we get to the mainline of the script. First we create a variable called “panel” which is an instantiation of the BoxTaskPanel class. Then we display the form using the FreeCADGui.Control.showDialog(panel) method. This is performed inside a try/except block so that we handle any error the might occur.
Test The Macro
If you haven’t already, create a new Macro and cut/paste the code above into the editor. When you run the macro you should see the dialog box appear in the task panel.
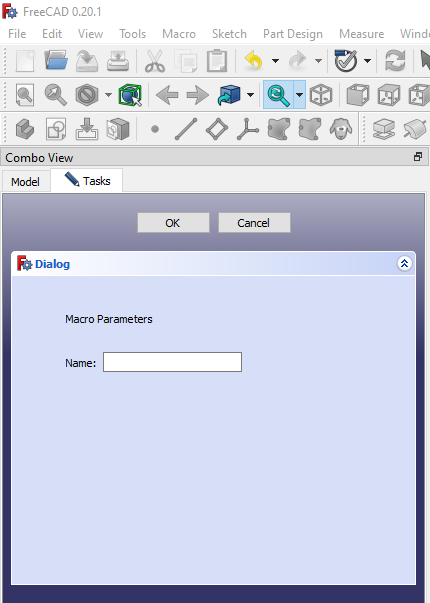
You should see the form appear in the task panel area. Notice that FreeCAD has provided the OK and Cancel buttons. Try each one and see if the code in the Accept and Reject methods runs. You will see the output in the Report View window at the bottom of the screen. While the form is displayed, go ahead and run the macro again. Notice the error display in the report view?
And Finally…
This post described how to create a Python script to display a form in FreeCAD. This ends the basic 3 part series on FreeCAD custom UI forms. In additional posts, I’ll publish some use macro’s I’ve created for my own work which will demonstrate more key functionality.