This post will discuss how to iterate the FreeCAD document tree using python. The tree is implemented using Qt’s Tree widget. Qt is a powerful cross platform GUI tookit used to develop FreeCAD. There are a lot of reasons why you would want to loop through all of the objects in a FreeCAD document. You might want to adjust some property of the objects. In my case, I want to clone the object (either a part or a body) and then scale it down to a smaller size. You can learn how to clone and scale here. But regardless of your use case, you first need to find all or some of the objects in your FreeCAD document.
You might be thinking, this is easy, just access all of the objects by looping through App.ActivieDocument.Objects(). This is easy, but it doesn’t return the objects in the same order they are arranged in the tree which doesn’t work for my use case so keep reading.
You can script the existing FreeCAD UI using the powerful python Qt API. We will demonstrate in this post how to iterate the FreeCAD document tree. You can also use Qt to design and implement your own dialog boxes in FreeCAD which is discussed in this post.
FreeCAD Document Tree View
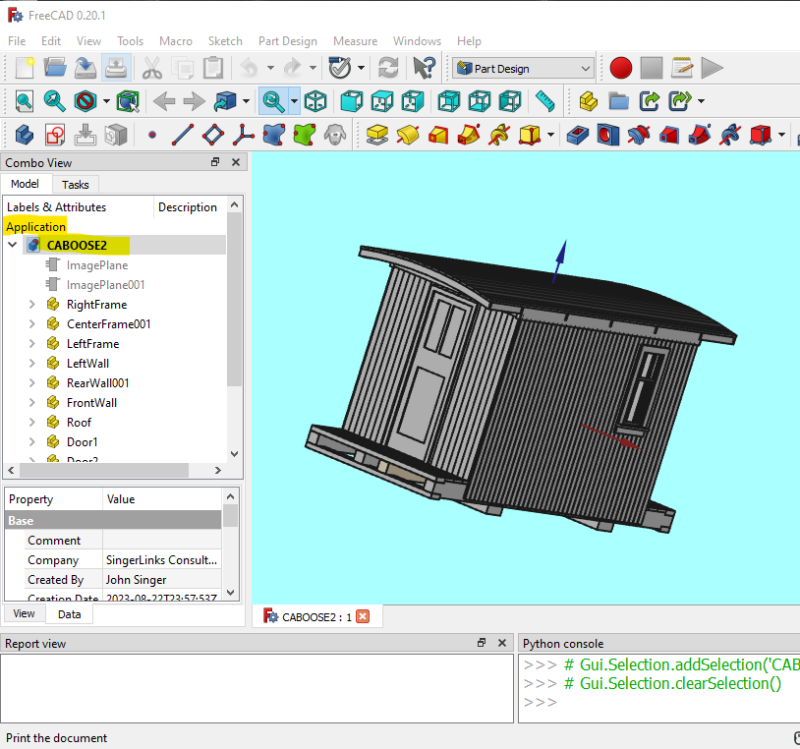
The following screen shot illustrates the FreeCAD Document tree.

The document tree is on the left hand side of the screen and shows all of the loaded models in what is called a tree view. You can open the different sections by clicking on the greater than sign which expands the tree and displays the child items underneath the parent. Qt provides a parent/child API that allows you to navigate the tree. This is implemented in a Model/View architecture where the Model stores the data and View displays the data. You can read more about this here.
Python Code
Now let’s look at some code for navigating the FreeCAD tree. The first example uses the parent/child API to navigate a subset of the tree. The second example uses an iterator to navigate the entire tree.
Parent/Child Tree Navigation
In the example below we only want to look at the objects that are at the top level of the tree for the active document. In the screen shot above you can see all of the Part objects that make up the “Caboose2” document. These are the immediate children of the “Caboose2” document.
import FreeCAD as App
from PySide import QtGui

print("Start TreeView Iterate - {}".format(App.ActiveDocument), end = "\r\n")

# get the treeview widget
tree = FreeCADGui.getMainWindow().findChildren(QtGui.QTreeWidget)[0]
# get the invisible root item of the tree
root = tree.invisibleRootItem()
# get the "application" node in the tree
appl = root.child(0)
# get the first node of the open model which is the document
model = appl.child(0)
# now iterate through the children of the FreeCAD model
modelCount = model.childCount()
for i in range(modelCount):
	object = model.child(i)
	treeLabel = object.text(0)
	print("TreeLabel: {}".format(treeLabel))
	try:
		# get the freecad object represented by the treeview item
		FreeCADobject = App.ActiveDocument.getObjectsByLabel(treeLabel)[0]
		# do your logic here
		print('Object - {}:{}:{}:{}'.format(treeLabel,str(FreeCADobject),FreeCADobject.Name,FreeCADobject.Label))
	except Exception as e:
		# in case anything goes wrong
		print(e)
		FreeCADobject = None

App.ActiveDocument.recompute()

print("Finished", end = "\r\n")
This is the entire script for scanning the immediate children of the document. I’ll explain how it works below.
Explanation
import FreeCAD as App
from PySide import QtGui
First we do some imports. Importing QtGui gives us access to the Qt API’s.
# get the treeview widget
tree = FreeCADGui.getMainWindow().findChildren(QtGui.QTreeWidget)[0]
First, we need access to the tree widget itself. “getMainWindow()” returns the top level widget for the application. “findChildren(QtGui.QTreeWidget)” returns all of the tree widgets contained in the top level widget. This returns a list since there might be more than one so we get the first entry in the list which is the only treewidget on the UI.
root = tree.invisibleRootItem()The tree variable points to the tree widget, but now we need to access the individual elements in the tree. These are referred to as items and you can get the very top level node of the tree by using the “invisibleRootItem()” function. Note that there is no visible representation of this node on the FreeCAD UI.
appl = root.child(0)The model item object presents an API that let’s you navigate the tree. Here we use the child() method to return all the children items under the root node. In the screenshot above this represents the word “Application” which represents FreeCAD itself in the tree hierarchy.
model = appl.child(0)Now we use the child() function again to get the first child of the “Application”. This represents the first FreeCAD document in the application and is called “Caboose2” in the screenshot above.
modelCount = model.childCount()
for i in range(modelCount):
	object = model.child(i)
Now we are ready to iterate through all the immediate children of the document (“Caboose2”) node. First, we use the “childCount()” function to get the number of child nodes. Then we use a “for” loop with the range function to loop through the child items. Finally, we set the object variable to the “model.child(i)” which returns the next child object in the list of all children nodes.
treeLabel = object.text(0)The object variable is a Qt “Item” in the treeview. The object.text() function returns the text values of all of the columns of the treeview item the first of which is what you see on the UI.
FreeCADobject = App.ActiveDocument.getObjectsByLabel(treeLabel)[0]The final step is to get the actual FreeCAD object that is represented by the node in the tree. The getObjectsByLabel(treelabel) function does just that. Remember that a FreeCAD model can have multiple objects with the same label, so we just grab the first one. This is probably a good example of why it is a good practice to have unique labels for your FreeCAD objects.
Now you have the FreeCAD object and you can perform whatever operations on it you want.
Iterate The Entire Tree
In the example above I used the item API to navigate a subset of the application tree. What if you want to visit every node in the tree in order? There is an easy solution for that as well which is called a python “iterator”. Qt provides an iterator for the tree widget that will traverse the entire tree.
import FreeCAD as App
from PySide import QtGui

print("Start TreeView Iterate - {}".format(App.ActiveDocument), end = "\r\n")

# get the treeview widget
tree = FreeCADGui.getMainWindow().findChildren(QtGui.QTreeWidget)[0]

it = QtGui.QTreeWidgetItemIterator(tree)
for nextObject in it:
	object = nextObject.value()
	treeLabel = object.text(0)
	print("TreeLabel: {}".format(treeLabel))
	try:
		# get the freecad object represented by the treeview item
		FreeCADobject = App.ActiveDocument.getObjectsByLabel(treeLabel)[0]
		# do your logic here
		print('Object - {}:{}:{}:{}'.format(treeLabel,str(FreeCADobject),FreeCADobject.Name,FreeCADobject.Label))
	except Exception as e:
		# in case anything goes wrong
		print(e)
		FreeCADobject = None

App.ActiveDocument.recompute()

print("Finished", end = "\r\n")
This example uses the tree widget iterator to visit every node in the tree.
it = QtGui.QTreeWidgetItemIterator(tree)First, we use the QTreeWidgetItemIterator(tree) function to return the iterator.
for nextObject in it:Now we use a “for” statement to loop through the iterator.
object = nextObject.value()You would think that “nextObject” would be the next “item” in the tree but it’s just the iterator pointing at the next item so we need to use the “value()” function to get the actual tree item.
The rest of the code works just like the first example.
Shout out to TheMarkster
Here is a post in the FreeCAD forum that has a nice code example that uses a recursive function and the navigation API to navigate the entire tree. He also has a youtube channel with a bunch of FreeCAD videos.
And Finally…
Thanks for reading this post. Hopefully you will be able to use some of this code in your own scripts. If you’re interested, I have several other posts covering the topic of python scripting in FreeCAD.