This Python Vosk tutorial will describe how to convert speech captured using a microphone to text. In a previous post we described how to convert a podcast or mp3 file to a JSON text file so we will skip how to save the transcription results in a JSON file.
This is part of a series of posts so if you’re starting here you might want to read the first three posts:
- Which Python Library To Use For Speech To Text Conversion
- How To Setup A Python Speech To Text Environment Using Vosk
- How To Convert Speech To Text Using Python and Vosk
- How Convert A Live Stream Podcast To Text
In the post that describes how to set up the environment we created a python virtual environment and a batch file to activate it. We also installed a number of libraries that are needed for this post. On my Windows 10 system when I start the command line window I get a command prompt with the current directory set to my c:\users\xxx where xxx is my windows userid. You can get to the windows command line by searching for command prompt and running the application. The batch file we created was called NLP.bat so if you enter that into the command prompt you should activate your python virtual environment. We also created a batch file for Idle so go ahead and start your Idle python editor.
The SoundDevice Python Library
The script in this post makes use of the “sounddevice” python module. “sounddevice” provides a python api for the “PortAudio” library. It also provides functions that facilitate the use of numpy arrays to store and analyze the audio data. From the PortAudio website:
PortAudio provides a very simple API for recording and/or playing sound using a simple callback function or a blocking read/write interface. Example programs are included that play sine waves, process audio input (guitar fuzz), record and playback audio, list available audio devices, etc.
http://www.portaudio.com/
Transcribe Live Stream To Text
Once you are in Idle, you can cut and paste the following code into the Idle terminal. This script will convert microphone speech to text.
#!/usr/bin/env python3

import queue
import sounddevice as sd
from vosk import Model, KaldiRecognizer
import sys
import json

'''This script processes audio input from the microphone and displays the transcribed text.'''

# list all audio devices known to your system
print("Display input/output devices")
print(sd.query_devices())


# get the samplerate - this is needed by the Kaldi recognizer
device_info = sd.query_devices(sd.default.device[0], 'input')
samplerate = int(device_info['default_samplerate'])

# display the default input device
print("===> Initial Default Device Number:{} Description: {}".format(sd.default.device[0], device_info))

# setup queue and callback function
q = queue.Queue()

def recordCallback(indata, frames, time, status):
    if status:
        print(status, file=sys.stderr)
    q.put(bytes(indata))

# build the model and recognizer objects.
print("===> Build the model and recognizer objects.  This will take a few minutes.")
model = Model(r"C:\Users\jsing\pyenv\NLP\model")
recognizer = KaldiRecognizer(model, samplerate)
recognizer.SetWords(False)

print("===> Begin recording. Press Ctrl+C to stop the recording ")
try:
    with sd.RawInputStream(dtype='int16',
                           channels=1,

                           callback=recordCallback):
        while True:
            data = q.get()
            if recognizer.AcceptWaveform(data):
                recognizerResult = recognizer.Result()
                # convert the recognizerResult string into a dictionary
                resultDict = json.loads(recognizerResult)
                if not resultDict.get("text", "") == "":
                    print(recognizerResult)
                else:
                    print("no input sound")

except KeyboardInterrupt:
    print('===> Finished Recording')
except Exception as e:
    print(str(e))
Explanation of Python Code
Let’s walk through the code and see what it does.
import queue
import sounddevice as sd
from vosk import Model, KaldiRecognizer
import sys
import json
First a few imports. The vosk module provides an easy to use python api for transcribing audio to text using the Kaldi project. The “sounddevice” module is used to capture the audio from the microphone.
Input and Output Devices
# list all audio devices known to your system
print("Display input/output devices")
print(sd.query_devices())
Now we have to define the input device (the microphone) that is connected to our computer system. The “sd.query_devices()” function will display all of the input and output audio devices configured on your system. A second way to list all devices is from the command line. See the screenshot below:
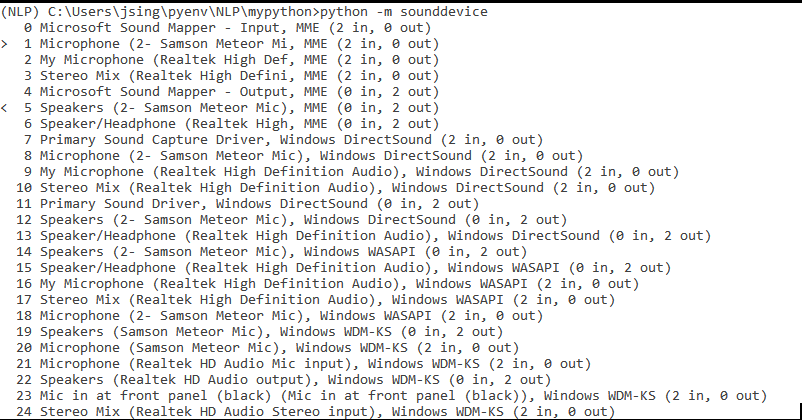
This listing was produced by entering the “python -m sounddevice” command on the command line. The list shows all of the sound devices configured on my Windows 10 laptop. It seems to list the actual microphones (I have two, one is built-in and the other is connected via a USB port) multiple times, one for each api (DirectSound, WASAPI, etc).
If you look at the far left margin of the listing above, you will see a “>” symbol next to the number 1 device and a “<” next to the number 5 device. This indicates the default input and output device configured on the system. The python script in this post relies on using the default microphone but it is possible to use any input device in the list by specifying it specifically. See the “sounddevice” website for example code.
# get the samplerate - this is needed by the Kaldi recognizer
device_info = sd.query_devices(sd.default.device[0], 'input')
samplerate = int(device_info['default_samplerate'])

# display the default input device
print("===> Initial Default Device Number:{} Description: {}".format(sd.default.device[0], device_info))
Now we get the “device_info” for the default input device. “sd.default.device[0]” returns the default input device. If you specified “1” as the index, you’d get the default output device. Next we create the samplerate variable which is needed to create the recognizer object.
Audio Processing
# setup queue and callback function
q = queue.Queue()

def recordCallback(indata, frames, time, status):
    if status:
        print(status, file=sys.stderr)
    q.put(bytes(indata))
The next step is to create the variable “q” which is a python queue. After that we define the callback function that will take a chunk of audio data from the microphone and put it on the queue. We’ll show how the callback function is used soon.
# build the model and recognizer objects.
print("===> Build the model and recognizer objects.  This will take a few minutes.")
model = Model(r"C:\Users\jsing\pyenv\NLP\model")
recognizer = KaldiRecognizer(model, samplerate)
recognizer.SetWords(False)
Now we create the text translation model that will control the speech analysis. The parameter to the Model object is the folder that contains the model you downloaded as a part of the setup. (See this post) You can specify the entire path as I’ve done here or just the path relative to where the python script is running. Next we define the “recognizer” variable with is a Kaldi recognizer object. This is what translates the audio to text using the supplied model. Notice we used the samplerate derived from the default microphone as input to the recognizer. Finally, we call the SetWords function with the value “False”. This limits the output from the recognizer to only chunks of text and not each word.
Processing Loop
try:
    with sd.RawInputStream(dtype='int16',
                           channels=1,
                           callback=recordCallback):
Now we get to the processing loop that will capture the audio and transcribe it to text. This all occurs within a try/except block. The “with” statement creates a raw input stream. The nice thing about the “with” construct is it automates calling the stop and start functions on the stream. The input stream knows to use the default input device because we did not provide the device= parameter. I did find through trial and error that you do need to provide the dtype and channels parameters. Finally, the callback parameter names the callback function we defined earlier in the script. The callback function is called automatically by the “RawInputStream” and what the function does is put the audio data on the queue.
        while True:
            data = q.get()
            if recognizer.AcceptWaveform(data):
                recognizerResult = recognizer.Result()
                # convert the recognizerResult string into a dictionary
                resultDict = json.loads(recognizerResult)
                if not resultDict.get("text", "") == "":
                    print(recognizerResult)
                else:
                    print("no input sound")
The “while True” creates an infinite loop that will process the audio data. First it gets whatever data is in the queue. Remember the callback function places the data in the queue. The data is then given to the recognizer object using the “AcceptWaveForm” method. If the method returns true the results are retrieved using the “Result” method. If the results dictionary contains a “text” key the value is printed otherwise the script prints “no input sound”.
except KeyboardInterrupt:
    print('===> Finished Recording')
except Exception as e:
    print(str(e))
After the processing loop we have two except statements to handle errors. The first one captures a Ctl-C using the KeyboardInterrupt exception. This is the only way to get out of the processing loop.
And Finally…
This post shows how to convert microphone speech to text in real time using Python and Vosk. If you also want to record the audio and save the transcribed text then look at the other posts to see how that works and hack them together with this one. Please leave any comments or questions below.